Saturday, November 9, 2013

Miss Mustard Seed Milk Paint Buffet: Tricycle

Today I want to share with you a piece that is so special to my heart.  I shared this post on I Know the plans I Have for You (notice my watermark ;) ), and just couldn't pass up sharing it here. My grandmother passed away 10 years ago. Although I have many things of hers that she left for me, it wasn't until long after her passing that this buffet came into my home. 


 I have always loved it, but the color {for me} not so much. I love its masculine shape as well as the quality of the piece. It has made a great stand for our TV,  but I've had great plans for it. I was just getting ready to redo it with Annie Sloan Chalk Paint (which I just ♥), UNTIL...I found out that I could get Miss Mustard Seed's Milk Paint only 5 minutes from my house!! Red Posie is THE cutest little vintage furniture shop in old town St. Charles. If your local, you MUST check it out!

My original plan for the buffet was to paint it black and stain the top walnut. But, I have to say that every red piece that I have ever seen in blogland, just jumps out at me. So, I decided to paint it using Tricycle.

It's a little shocking at first sight, right?? I know. Don't be afraid!! You won't regret it.
I'll start from the beginning....
It has a veneer top that's chipped in a few places, but I knew that I would be able to strip it down easily and thought I would just repair the chips. I first stripped the top of the buffet using {spray} Klean-Strip Stripper. It is so easy to use, and so much less messy than the brush on kind, and in my opinion much less stinky (and I had to use it inside). Spray it on, let it sit about 15 minutes, and scrape off. Easy peasy!

 What you scrape off REALLY looks disgusting (and is!). Make sure you wear gloves. It will burn your skin pretty quickly.

I didn't take pictures of the staining process, but once the top was stripped, I gave it a good sanding and 2 coats of Minwax dark walnut stain. The chipped parts took the stain so well, that I didn't even need to repair them. I love that it isn't perfect, and the stain really hides the imperfections. Before you paint, you want to fill in any knob or pull holes that you won't be using. Then it's time to paint!

If you aren't familiar with Milk Paint, the first thing you should know, is that it comes in powder form. You just mix it with warm water. The second thing you should know, is that it has a mind of its own as far as how it will adhere to your piece. If you know that you don't want that chippy look, there is a bonding agent that you could mix into the paint. I really love chippy furniture and wanted that for this piece, but like I said before, I'm not fond of the lighter wood. So instead of adding the bonding agent, I first applied a coat of ASCP in Graphite so that any of the milk paint that didn't stick would show a darker layer. (Don't you just love the top??)


I have to admit that I was a little intimidated by mixing the paint, but you can find a great video here. I'm not sure where I read this next tip, but somewhere I read that the red powder was a little hard to mix. You can add a little liquid soap to the mixture to help break it down and using just a little does not affect the way the paint adheres. I found out that it was hard to mix, and added just a drop of Palmolive. Worked great. It still took a lot of mixing and you will still have some lumps but that is ok. Another thing to remember is to CONTINUE TO MIX THROUGHOUT THE PAINTING PROCESS.  The powder will settle at the bottom, so you want to make sure that you keep mixing it. Again, I didn't take pictures of this process, because it was late and the lighting just wasn't good. I brushed on 2 coats waiting about an hour between coats. The paint dries pretty quick and I didn't sand in between coats. Once both coats were dry, I used a little sand paper and a sanding block to bring out the darker paint in areas. The paint goes on SO smooth, there really wasn't any brush marks. Along with the paint, I also purchased the Antiquing Wax.

This was my favorite part! I love this wax! It is a soft wax that I applied with a brush pretty much on the entire thing. It really toned down the red and and the color is amazing. You brush (or wipe) it on, wait about 5 minutes and buff to a nice satin sheen. I also used it on the top, but I'm not sure that I would recommend that, only based on the price of the wax. I also added glass knobs. Here is what I ended up with, and I have never been happier with anything that I have redone! Get ready for picture overload:


Did you notice my book pumpkin?? Cute right?


Pin It!

I get SO much use out this little lovely! It stores all of the kids toys, dvd's, books, and any other mess that 2 kids can make when a quick clean up is in need. I'd love to hear what you think! Thanks for stopping by :)


Sharing at:


[Continue reading...]

Thursday, November 7, 2013

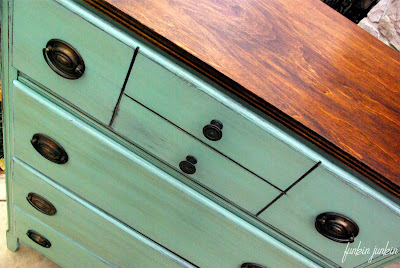
Antique Chest of Drawers Makeover

Hey guys! It has been so long since I've blogged about anything, and I have has SO many changes in my life over the last year, but I will have to update you in a different post. This blog is still new, and I have a TON of stuff to still add to it, and it's a bit under construction, so please forgive me. If you're not already a follower of my other blog, I Know the Plans I Have for You, I'd love for you to check out tons of my other projects! I've been getting back into refinishing furniture full time, so I will be sharing lots of projects to come. I've also opened a new Etsy shop, Funkin Junkin, where you can find this little lovely!. Today I want to share with you one of my new favorite pieces....a 1040's chest of drawers.


I stripped the top and stained it with my go to stain, Minwax Dark Walnut. Mahogany is a very hard wood, so it took 3 or 4 coats to get the color I was going for. Then I mixed together 2 Annie Sloan Chalk paint colors, Antibes Green and Louis Blue, to get a beautiful mint-e-ish green. One coat was all it took. After a little distressing, I applied 2 coats of clear wax, and a coat of dark wax as well as dark wax for the the top.


This one was a bit hard to put a tag on, but I know that it will find a very special home :)
Thanks for stopping by!

Linking up to:

[Continue reading...]